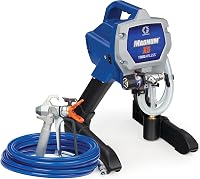
How to Set Up a Vevor Airless Paint Sprayer
To set up a Vevor airless paint sprayer, unpack it, fit the tip and guard, connect the hose, and prime the pump with paint before spraying. Tighten every fitting, keep the pressure low at first, and test the pattern on scrap material.
On this page (8 sections)
- What should you unpack and check before setup?
- How do you fit the tip, guard and hose correctly?
- How do you prime a Vevor airless paint sprayer?
- Which Vevor model fits your setup?
- How do you set pressure and test the spray pattern?
- What safety checks should you do before the first spray?
- How do you connect a paint spray gun to the rest of the setup?
- What should you do when the setup is done?
To set up a Vevor airless paint sprayer, unpack it, fit the tip and guard, connect the hose, and prime the pump with paint before spraying. Tighten every fitting, keep the pressure low at first, and test the pattern on scrap material.
The order matters more than the speed. Get the fittings and the prime right on the first try and the sprayer holds steady pressure for the whole job.
Rush that part and you'll spend the afternoon chasing leaks and splatter instead of painting.
What should you unpack and check before setup?
Lay out every part and read the quick-start sheet first. These units ship as a stand or cart frame with a pump, a hose, a spray gun with a tip and guard, and a cleaning brush.
Check that nothing is loose or dented before you plug anything in.
The VEVOR 750W Stand Airless includes a 7.6-meter hose and a detachable pump body for cleaning. A long hose is a good thing on setup day, because it lets you keep the pump away from the wall while you test.
The two stand models and the cart model all share a metal frame. Run a hand over the welds and check the wheels on the cart before you load paint, since a wobble is easier to fix on an empty unit.
Set the sprayer on a flat, steady surface where the hose won't trip anyone. Fill the paint container only after the pump and gun are connected, so a spill can't reach the motor.
Keep a rag and a bucket of water or solvent nearby. You'll want them the moment a fitting drips during the prime step.
How do you fit the tip, guard and hose correctly?
Thread the hose onto the pump outlet and the gun inlet by hand first, then snug it with a wrench. Cross-threading is the most common setup mistake, and it shows up later as a leak that sprays sideways.
Fit the tip into the guard, then screw the guard onto the gun until it seats. Point the guard's opening in the direction you'll spray.
These sprayers use a reversible tip, so a clog can be cleared by flipping it later without removing it.
Check the inlet filter and the gun filter before the first run. A small screen keeps grit out of the tip and gives you an even fan.
The 650W Stand Airless ships with a 517 tip and an 11.8 in tip extension rod. Fit the extension only when you need reach on high or low areas, and keep the gun light while you test.
The rubber hose is built to take the 3000 psi these pumps deliver, so don't swap in a lighter line from the hardware store. Keep the coils straight rather than kinked when you lay it out.
How do you prime a Vevor airless paint sprayer?
Set the prime valve to prime, lower the pressure, and run the pump until paint flows steadily back into the bucket. This pushes air out of the pump and hose so the first spray isn't a sputter.
Most units prime with the gun trigger held open or the prime valve open, depending on the model. Follow the order in the quick-start sheet, then close the valve and let the pump build pressure.
Keep the gun pointed into the bucket during this step. A few ounces of paint will come out before the flow is smooth, and you don't want it on the floor.
Our full walkthrough of how to prime an airless paint sprayer covers the valve positions in more detail. It's worth reading once before your first job.
Which Vevor model fits your setup?
Match the sprayer to the size of the job and how often you'll move it. All three reach 3000 psi, so the differences come down to motor size, flow rate and frame.
Who should choose the 750W Stand Airless?
The 750W Stand Airless is the best fit for most home jobs, with a 1.2 LPM flow rate and a stand frame that stays put on a flat floor. Its detachable pump body makes the end-of-day cleaning easier.
Pick this one for interior walls, furniture and fences where you'll set up once and work around the house. The 7.6-meter hose gives you room to move without dragging the pump.
At 19.6 pounds it is light enough for one person to lift onto a bench or carry up a flight of stairs.
Who should choose the 650W Stand Airless?
The 650W Stand Airless suits smaller projects and lighter use. It runs a 7/8 HP motor and ships with a 517 tip and a tip extension rod for ceilings and high walls.
Choose it if your projects are occasional and you want the extension rod built in. Its 25 ft hose covers most single rooms.
The unit weighs 14.9 pounds, the lightest of the three, so it is the easiest to carry between jobs. It sprays water-based and oil-based paints, including latex, chalk, stain, sealer and varnish.
Vevor says the model is built for a recommended annual use of 125 gallons, which tells you how much work it is meant to take.
Who should choose the 950W Cart Airless?
The 950W Cart Airless is the best fit for large exteriors, with a 2.0 LPM flow rate and wheels that roll the pump to the work. The higher flow keeps long passes moving without fading.
Pick this one when the job is bigger than a room or two. The cart frame and 600-inch hose mean fewer trips to move the unit.
The 950W motor and 2.0 LPM flow put it above the 750W model on output, and its wheeled frame means you roll it into place instead of lifting. If you're just starting out, our guide to the best paint sprayer for beginners can help you decide whether a stand or cart frame suits you.
How do you set pressure and test the spray pattern?
Start at a low pressure setting and raise it in small steps until the fan is even. These sprayers reach up to 3000 psi, and the top of the range is rarely needed for latex on a wall.
Hold the gun about 10 to 12 inches from scrap cardboard and pull the trigger for a short burst. A good pattern is a clean oval with soft edges and no heavy center stripe.
If the fan looks too narrow or too wide, change the tip rather than forcing the pressure higher. A tip that's too small for the paint makes the pump work hard and the pattern sputter.
The 517 tip on the 650W model is sized for unthinned paint, so you can draw straight from the bucket without thinning first.
Adjust the flow control knob on the pump to fine-tune the output for the material. Watery stains need less; thick latex needs more.
The speed control on these models also lets you drop to a low gear for large areas and lower paint use. Vevor says the 650W Stand Airless's adjustable flow control can cut paint spills by up to 55 percent when you match the setting to the job.
What safety checks should you do before the first spray?
Wear goggles, a respirator and gloves, and keep the gun pointed away from people. Airless sprayers atomize paint into a fine mist, and that mist reaches your eyes and lungs faster than you expect.
Check that the tip guard is tight and the trigger lock works before you fill the bucket. Never point the gun at your hand to test the pressure; airless spray can inject paint under the skin.
Keep the cord and outlet dry and away from the spray zone. Run the hose where nobody will trip on it, and tape it down on walkways.
Mask and cover surfaces you don't want painted before the test, not after. Overspray travels farther than a roller's splatter.
The fan-shaped atomization on these guns keeps the mist tight and saves paint, but it still needs a clear area to work in.
How do you connect a paint spray gun to the rest of the setup?
Treat the gun as the last part you fit and the first part you check. The gun-to-hose joint and the tip guard are where leaks show up, so snug them by hand and then with a wrench.
Our guide to how to set up a paint spray gun covers the trigger, filter and tip guard in detail. Read it once and the gun side of setup takes a few minutes.
Keep the gun clean between coats. A tip left to dry with paint in it clogs the next time you pull the trigger.
The cleaning kit that comes with the 650W model includes a brush for the gun body and tip, so you can clear dust and paint before each session.
What should you do when the setup is done?
Run a short test pass, check for drips at every fitting, and only then start on the wall. A setup is done when the pump holds pressure without pulsing, the hose stays dry at both ends, and the fan is even.
Watch the fittings for the first minute of spraying. A drip at the pump outlet or the gun inlet means a fitting needs another quarter turn, not more pressure.
When the job ends, flush the pump and hose right away. The detachable pump body on the 750W and 950W models comes off so you can reach the crevices with the included brush.
Our guide to how to clean an airless sprayer after latex paint walks through the flush so the next setup starts clean.
If the sprayer sat for a season, prime it again before you paint. Old paint in the hose is the usual reason a first coat looks rough.
Learning how to set up a Vevor airless paint sprayer properly once makes every later job quicker, because the fittings and the prime become routine.
Frequently asked questions
How long does it take to set up a Vevor airless paint sprayer?
Plan on 20 to 30 minutes for a first setup, including unpacking, fitting the tip and guard, and priming the pump with paint. Allow a little more time on the first job to test the spray pattern and pressure on scrap material.
Do I need to prime a new Vevor airless paint sprayer before use?
Yes. The pump needs paint or water pushed through the hose and gun so the air is gone and the spray is steady.
Run the prime step before you point the gun at a wall, and keep the pressure low until the pattern looks even.
What pressure should I start with on a Vevor airless sprayer?
Start at a low setting and raise it in small steps until the fan is even and the paint wets the surface without runs. These sprayers reach up to 3000 psi, so there is no need to begin near the top of the range.
Which tip size should a beginner fit first?
A mid-size tip for latex on walls is the usual first choice, matched to the material and the pump's flow. Start there, test the fan, and move to a larger or smaller tip only when the coat looks too thin or too heavy.
How do I know the sprayer is set up correctly?
You know it is set up correctly when the pump holds steady pressure, the hose has no leaks at the fittings, and the test fan is even and unbroken. If the pattern spits or fades, check the fittings, the tip, and the prime step.