How to Set Up a Paint Spray Gun
To set up a paint spray gun, match the nozzle to your coating, thin or strain the paint to the right consistency, connect the air supply or turbine, and run a test spray on cardboard before you aim at the wall. A few minutes of setup and a quick fan-pattern check prevent the drips, spatter and uneven coverage that send people back to a brush.
On this page (9 sections)
- What do you need before you start setting up?
- How do you match the nozzle to the paint?
- How do you thin paint for a spray gun?
- How do you connect the air supply or turbine?
- How do you fill and fit the cup?
- How do you test the fan pattern before spraying?
- How do you keep the gun running clean during setup and between coats?
- Which sprayer makes setup easiest?
- Common setup mistakes to avoid
To set up a paint spray gun, match the nozzle to your coating, thin or strain the paint, connect the air supply or turbine, and run a test spray on cardboard before you aim at the wall. A few minutes of setup and a quick fan-pattern check prevent the drips, spatter and uneven coverage that send people back to a brush.
This guide walks through the setup order for a typical air or HVLP gun. The same steps apply whether you're spraying trim, a cabinet door or a whole wall, and the order matters more than the brand of gun in your hand.
What do you need before you start setting up?
You need the gun, the right nozzle, a matching cup, a wrench, straining material, thinner if the coating needs it, and a piece of scrap cardboard for testing. Missing any of these means a stop mid-job, so gather them first.
Set up indoors or in a shaded area where wind won't blow your test pattern away. Keep a rag and a small container of the solvent your coating uses within reach for wiping drips and cleaning the nozzle tip.
Lay cardboard or newspaper down before you open the paint. A full cup can tip while you adjust the gun, and a few minutes of prep keeps the floor clean.
How do you match the nozzle to the paint?
The nozzle size is the first setup decision, and it should match the coating's thickness. Thin stains and lacquers need a smaller opening; thick paint and primer need a larger one.
A mismatch gives you either a sputtering spray or a pattern that clogs.
A typical air gun uses an opening in the 1.3mm to 2.0mm range. The Fuji Spray Semi-PRO 2 arrives with a 1.3mm air cap set installed, so it's set up for thin finishes from the start.
A larger set is the usual swap for heavier paint.
Which gun comes set up for which coating?
The right starting point depends on what you plan to spray. The Fuji Spray Semi-PRO 2's installed 1.3mm cap set is ready for stains and thin lacquers.
The Wagner FLEXiO 595's iSpray nozzle is built to handle unthinned interior and exterior paint on walls and siding.
If you're unsure which coating suits a sprayer, our guide to what kind of paint works best in a sprayer breaks down finishes by nozzle type. Match the paint first, then the nozzle, then the setup steps.
How do you thin paint for a spray gun?
Thin only when the coating is too thick to atomize cleanly. Many modern paints spray straight from the can, especially with a larger nozzle.
If the spray comes out lumpy or stringy, thin a small batch first.
Add thinner a little at a time and stir well. Stop when the paint flows off a stir stick in a thin, steady stream.
Too much thinner causes runs and weak coverage, so measure what you add so you can repeat the mix.
The Fuji Spray Semi-PRO 2 is the pick when you want to spray thin finishes with a system that runs on its own turbine. Its adjustable fan control lets you tighten the pattern to a small circle for trim or open it wide for flat panels.
The air control valve on the hose lets you trim overspray and bounce back without changing the regulator.
When should you skip thinning?
Skip thinning when your gun's nozzle already matches the coating. The Wagner FLEXiO 595's X-Boost turbine sprays unthinned interior and exterior paint and stains with its iSpray nozzle, so there's no mixing step for wall and siding jobs.
Thinning stays useful for detail work. The Detail Finish nozzle on the FLEXiO 595 handles cabinets and furniture, where a slightly thinner mix lays down a smoother coat.
Keep both nozzles clean and switch them only when the gun is off.
How do you connect the air supply or turbine?
Connect the gun to its air source and check for leaks before you add paint. An HVLP gun connects to a turbine or a compressor through its hose; an airless gun connects to its pump.
The connection type depends on the system.
For a turbine system, snap the hose to the turbine outlet and the gun inlet. For a compressor-fed gun, fit the correct coupler and set the regulator to the gun's rated pressure.
For an airless pump, follow the maker's hose and gun assembly order.
Turn the air on and listen at each joint. A hiss means a loose fitting.
Tighten with a wrench, not by hand alone, and check again before loading the cup.
How do you set pressure on an airless sprayer?
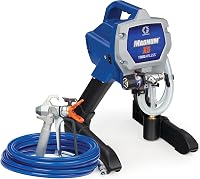
Set pressure with the pump's control and confirm it with a test spray. The Graco Magnum X5 has a fully adjustable pressure control and a flexible suction tube that draws straight from a 1 or 5-gallon bucket.
Its maximum pressure reaches 3000 psi, so start low.
Raise pressure only until the pattern atomizes evenly. An airless pump that's set too high wastes paint and throws more overspray.
Before the first coat, prime the pump and hose so old fluid and air don't end up on the wall. Our walkthrough on how to prime an airless paint sprayer covers that step in order.
How do you fill and fit the cup?
Fill the cup to its fill line, not to the brim, and screw it on firmly. A cup packed too full leaks through the vent and starves the gun of air.
Leave a little headspace so the vent can breathe.
Strain the paint through a mesh filter as you pour. This catches skin and grit that would otherwise clog the nozzle mid-pass.
Wipe the cup threads clean before you screw the lid down so paint doesn't seep.
Check the cup seal for cracks and fit it straight. A cross-threaded cup sprays air into the paint and gives you a spitting pattern.
Give the lid a final snug turn by hand.
How do you test the fan pattern before spraying?
Spray a test pattern on cardboard at your normal working distance and adjust until the band is even. This is the last setup step and the one most people skip.
It takes under a minute and saves a repaint.
Hold the gun level and make one steady pass. A good pattern is a wet, even band with soft edges.
If the band is split or heavy in the middle, the air or fluid is off.
- Runs or sags mean the fluid flow is too high: close the fluid knob a quarter turn.
- A dry, speckled band means too little fluid or too much air: open the fluid or lower the pressure.
- A fan that's too wide for trim means tightening the pattern control.
Repeat until the band looks right. Keep the cardboard so you can compare later coats.
How do you keep the gun running clean during setup and between coats?
Wipe the nozzle tip and keep the air cap clear between coats, and do a full clean at the end of the job. Setup and cleaning use the same parts, so learn the routine now.
Wipe the tip with a rag and the right solvent whenever paint builds up. A crusted tip distorts the fan pattern.
If the pattern changes mid-job, stop and clean rather than turning up the pressure.
At the end of the session, flush the gun and hose with the coating's solvent. Our guide to how to clean an air paint spray gun covers the full teardown for air guns.
A clean gun starts the next job with the same setup you dialed in.
Which sprayer makes setup easiest?
The Graco Magnum X5 is the pick for big wall and exterior jobs, the Wagner FLEXiO 595 for handheld work and small spaces, and the Fuji Spray Semi-PRO 2 for thin finishes. Each one changes how much setup you do before the first pass.
The Magnum X5 draws from a bucket and sprays unthinned paint, so setup means priming the pump and hose. The FLEXiO 595 swaps nozzles instead of cups, so setup is quicker for touch-up and furniture.
The Semi-PRO 2 needs a thinned mix for its 1.3mm cap, which is the trade-off for its fine atomization.
If you're new to spraying, our roundup of the best paint sprayers for beginners compares setup effort across starter models. Start with a gun that matches your coating and your job size, and the setup steps above will feel routine after the first coat.
Common setup mistakes to avoid
Most setup problems come from four shortcuts: too-thick paint, a mismatched nozzle, a loose fitting and a skipped test spray. Fix those first before you blame the gun.
Don't overfill the cup or skip straining. Don't guess the pressure when the gun has a control you can set.
And don't start on the wall before the cardboard pattern looks right. A minute of testing beats a second coat over a mess.
When you pack up, follow the same order in reverse: flush the gun, clean the nozzle, and store the parts dry. Setup and teardown stay simple when the gun is clean, and the next job starts faster.
Frequently asked questions
What size nozzle should I use in a paint spray gun?
Match the nozzle to the coating: about 1.3mm for thin stains and lacquers, and 1.5mm to 2.0mm for thicker paints and primers. The Fuji Spray Semi-PRO 2 ships with a 1.3mm air cap set installed, which suits thin finishes.
How do I know the spray gun is set up correctly?
Spray a test pattern on scrap cardboard at your working distance. A correct setup lays down an even, wet band with soft edges.
If you see runs, reduce the fluid flow; if you see a dry, speckled pattern, open the flow or thin the paint.
What pressure should a paint spray gun run at?
Follow the gun's own specs rather than a generic number. An HVLP turbine system like the Fuji Spray Semi-PRO 2 runs at low pressure, while the Graco Magnum X5 airless pump reaches up to 3000 psi.
Start low and raise it until the pattern atomizes cleanly.